What is: React Query
How-to: ReactQueryDevtools
The ReactQueryDevtools will show us what the react queries are doing. And the useQuery, which is a function from react-query, will be used to fetch our data.
The ReactQueryDevtool pretty much works the same way as the SWR library.
$ yarn add react-query
$ yarn add react-query-devtools

or

$ npm install react-query
$ npm i --save react-query-devtools
📌 Quick Features: React Query Devtools
View the cache in realtime
Inspect core query objects and query data payloads
Manually refetch & remove queries
import { ReactQueryDevtools } from "react-query-devtools";What is: Query Strings?
Basically, it let users handle their own query implementation by enforcing a built-in query string parsing.
So a typical query string might look like key-value pairs.
https://ahappynook.com/?q=react&ia=web
But if, let’s say, we wanted to include the search string and filter value in the URL, we would want a query string to look like this.
https://ahappynook.com/catalogs?q="linens"&clearance=true
And this how we need to set the route definition.
<Route exact path={"/catalogs"} component={CatalogsRouteLoader} />import { asyncComponent } from "client/async-component";
import * as React from "react";
import { RouteComponentProps } from "react-router-dom";
export const CatalogsRouteLoader = asyncComponent({
resolve: async () => {
const Search = (await import(
"client/pages/catalogs"
)).Catalogs;
const Wrapper: React.FunctionComponent<
RouteComponentProps
> = props => {
return (
...
);
};
return Wrapper;
},
name: "CatalogsPage",
});If you want to use this in your React Native app:
$ npm i --save-dev react-query-native-devtools react-native-flipper
# or
$ yarn add --dev react-query-native-devtools react-native-flipper
You can check out this Github by bgaleotti on how to register the plugin in your React Native application.
Now let’s build another simple create react app using rates API that will show currency exchange rates. We will also make use of this awesome ReactQueryDevtools.
Right off the bat, let’s add the ReactQueryDevtools in the highest component hierarchy as we can, which, in this case, is in the App.js.
import React from "react";
import { ReactQueryDevtools } from "react-query-devtools";
import "./App.css";
import { useQuery } from "react-query";

export default function App() {
  return (
    <div className="App-header" color="blue">
      <CurrencyExchange />
      <ReactQueryDevtools initialIsOpen={false} />
    </div>
  );
}

function CurrencyExchange() {
  return <div> The Current Currency Exchange Rate For: </div>;
Next, we will connect our api.

Click on the small icon at the bottom left corner to show the devtool. And the below screenshot when you clicked it. Right now, there is nothing there yet because we are yet to hook our API, which is what we are going to do next.

In our function component CurrencyExchange, we will set up a variable and call the useQuery function. And we will pass the first 2 default values inside: queryKey and a function that will fetch the data and return a promise.
export default function App() {
  return (
    <div className="App-header" color="blue">
      <CurrencyExchange />
      <ReactQueryDevtools initialIsOpen={false} />
    </div>
  );
}

const fetchExchange = async () => {
  const response = await fetch("https://api.ratesapi.io/api/latest");
  const data = await response.json();
  return data;
};

function CurrencyExchange() {
  const {} = useQuery("latest", fetchExchange);

  return <div> The Current Currency Exchange Rate For: </div>;
When we check the browser, we are still not showing any data. But if we check the devtools, we will see this: [“latest”]

Next, let’s show some data that are being returned. In our fetchExchange function, we will pass some keys or values that are coming from our useQuery. The key can be string or an array.
const fetchExchange = async (currency) => {
  const response = await fetch("https://api.ratesapi.io/api/latest");
  const data = await response.json();
  return data;
};

function CurrencyExchange() {
  const currency = "NOK";
  const { status, data, error } = useQuery(currency, fetchExchange);

  if (status === "loading") return <div>loading...</div>;
  if (status === "error") return <div>Error loading data</div>;

return (
    <div>
      <h2>The Best Foreign Exchange Rate</h2>
      <pre>{JSON.stringify(data.rates, null, 2)}</pre>
    </div>
  );
}
We will also need to update our base query url and put our data.
`https://api.ratesapi.io/api/latest?base=${currency}`If we check our browser, we should be able to see this.

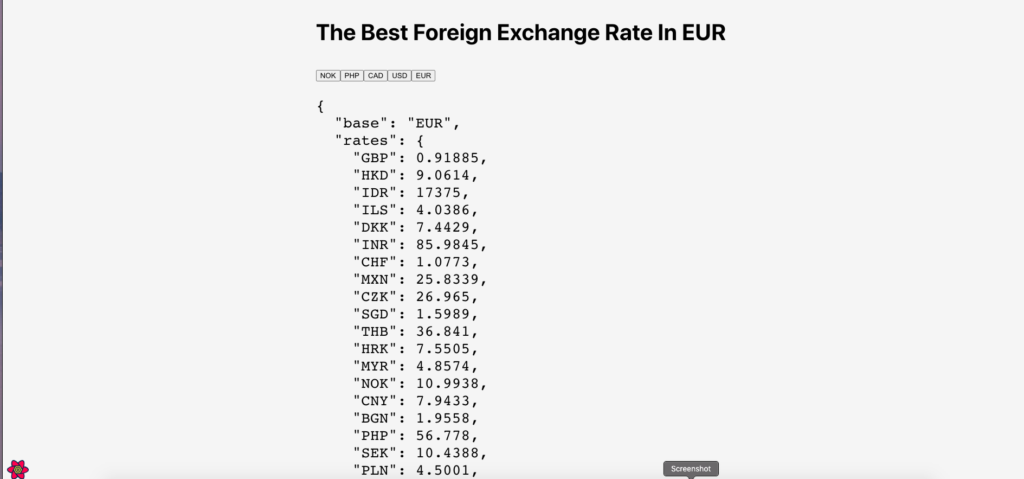
Let’s now convert our hardcoded currency key to use useState. And then, let’s create some buttons so users would be allowed to click their preferred currency.
function CurrencyExchange() {
  const [currency, setCurrency] = useState("NOK");
  const { status, data, error } = useQuery(currency, fetchExchange);

  if (status === "loading") return <div>loading...</div>;
  if (status === "error") return <div>Error loading data</div>;

  return (
    <div>
      <h2>The Best Foreign Exchange Rate In {currency}</h2>
      <button onClick={() => setCurrency("NOK")}>NOK</button>
      <button onClick={() => setCurrency("PHP")}>PHP</button>
      <button onClick={() => setCurrency("CAD")}>CAD</button>
      <button onClick={() => setCurrency("USD")}>USD</button>
      <button onClick={() => setCurrency("EUR")}>EUR</button>
      <pre>{JSON.stringify(data, null, 2)}</pre>
    </div>
  );
}
And we should be able to see the values below on our browser.


